

Studio Monitor Placement: The Basics
Positioning monitors correctly in your music making space is essential to ensuring an accurate listening experience. Every room has a specific set of resonant frequencies that will create what’s known as modes, caused by sound reflecting off different surfaces. The effects these modes will have on what you hear coming out of your speakers and how you hear it depend primarily on the position of both the listener and the monitors, and their relation, as well as on how the room itself is treated.
While acoustic treatment can be a daunting task, spending some time on your monitor placement, especially in bedroom or home setups where your options might be limited, will help you achieve a mixing environment that can ensure the results best translate to different playback situations.
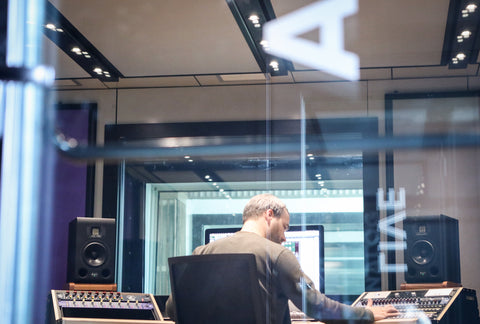
Main photo: Brooklyn-based producer and teacher BlankFor.ms in his home studio (Credit: Felix Zimmerman).
Finding the Right Place in the Room
Whatever the room you’re working with there are some considerations you should follow, starting with the understanding that placing your setup in the centre of the room is not recommended as that is where the sound is likely to be least reliable.
If your setup is intended primarily for making music, you should place it in the front area of the room based on its division into three areas of equal sizes. In turn, your listening position should be centred relative to the wall it faces and your monitors should be equidistant from the walls to their side and back, though with different distances between those two. If your room is of a rectangular shape you should prioritise one of the long walls as the one your listening position will be centred against to help minimise potential reflections from the side walls.
All of this should help create a balanced stereo image and more reliable frequency response.
Evaluating the Distance Between Monitors and Walls
Every solid surface in your space constitutes a potential boundary against which sound will reflect, to various degrees, which can cause phase cancellations and other unwanted acoustic interactions. Therefore, as mentioned above, your monitors should not be placed against the walls, and especially against corners, as this will create issues in the lower end of the spectrum. This is especially relevant if your monitors are rear-ported, meaning that the port which allows the air from the woofer to escape is situated at the back, which is often the case in smaller monitor designs. Backfiring port issues are one of the main reasons why in the development process of the HEDD MK2 monitor range we opted for a front-ported design, which helps mitigate some of these reflection issues.
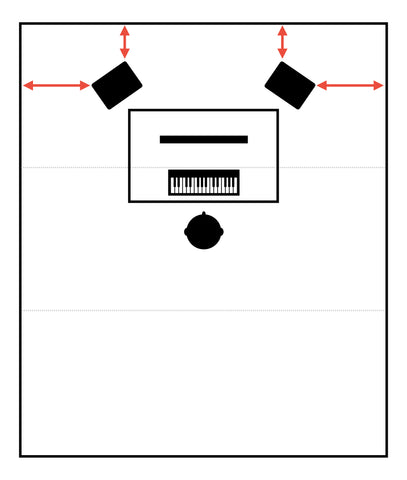
As a rule of thumb for nearfield monitors, which perform best up to around 2.5 m from your listening position, you want to consider a minimum distance of 20 to 30 cm (8 to 12 inches) between the monitors and walls, which is generally enough to reduce sound waves reflecting back to your listening position, and a maximum distance of between 60 and 90 cm. You should also remember that the distances between your monitors and the side and back walls should be different to avoid creating corners in your listening position. Therefore you could consider placing your monitors around 40 to 60 cm away from the back walls and 60 to 90 cm from the side walls.
Creating the Sweet Spot
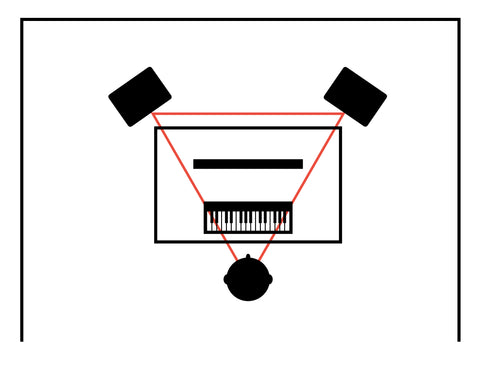
Once you’ve figured out the best place in the room for your setup and appropriate distances between the monitors and walls, you will want to finalise the positioning of the listener and monitors, aka the sweet spot, by bearing in mind that each of these are best located at the three points of an equilateral triangle. Crucially, the monitors should never face out directly but rather be turned towards the listening position at an angle of around 30 degrees in order to align with the ears of the listener.
Consideration should also be given to the ear level placement of the two key parts of a monitor - tweeter and woofer. In general, it’s recommended to have the centre of the tweeters be at ear level as this will help you more accurately discern what is happening at the higher end of the frequency spectrum. However, if this is not possible in your space or with how your monitors are placed, for example on a desktop, there are angling stands that will allow to raise your monitors and angle them towards you which can provide a good middle ground.
An ideal equilateral placement between monitors and listener, with the monitors separated from the setup.
Separating the Monitors from the Setup
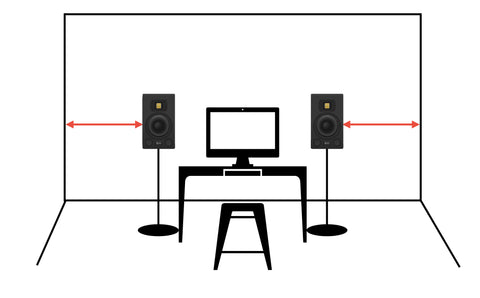
As a rule you want to avoid placing monitors directly on a hard surface, like a console or desktop, to avoid unwanted reflections and vibrations.
Monitor stands are a worthy investment for this reason, allowing you to separate the monitors from the rest of your setup and more easily adjust their distance and orientation. If stands are not an option, you should try and invest in either some decouplers, which isolate monitors from the surface they’re placed on, or some isolation pads, which will help absorb the vibration and mitigate the resonances. Pads, or rubber feet, can also be used with stands to help control the vibrations of the monitors on the stand’s hard surface (as show in the image at the top).
The HEDD MK2 monitor range features desktop filters with three different tunings designed to compensate for acoustic issues that arise from placing the monitors flat on a hard surface.
Adding and Placing a Subwoofer
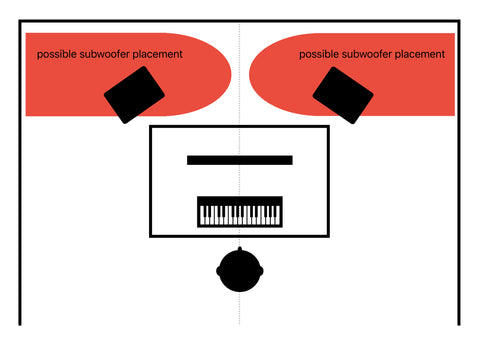
If you also have a subwoofer to add to your monitoring system, you should first ensure that the system is as correct as can be given your space without it. Subwoofers can trigger the acoustics in your room much more than monitors, especially if there is no or little treatment in the room. Adding the subwoofer last, in effect, is recommended as the goal of a sub is to provide a natural extension for your monitors without impacting other parts of the frequency range.
As the frequencies in the lower end of the spectrum are not directional, that is we do not perceive where they are coming from, the subwoofer does not need to be placed within the equilateral triangle of the sweet spot (as described above). Going back to a ‘typical’ music production setup located in the front of the room against the longest wall, a subwoofer can be placed off-centre along the front wall, though not too close to the wall as you also want to avoid reflective surfaces, much like you do with monitors.
You can also test different positions, using audio that contains a lot of lower frequencies, until you find the one that feels right for the specifics of your room. The key thing to remember is that you don’t want the subwoofer to exaggerate frequencies, as this will affect the accuracy of your mixes, but rather you want it to provide a flat response which is likely to be achieved by placing it in the same plane as the monitors or where it can excite the room’s modes in equal measures.
HEDD’s BASS subwoofer range feature the same Closed or Ported functionality as the MK2 monitors which can help mitigate some of the acoustic issues that subwoofers can cause.
Use DSP to Adjust to Your Needs
The HEDD MK2 range of monitors features DSP-enabled tools that can help adjust them to your space's limitations.
Considering the variety of challenges you may face in correctly positioning monitors in your room, especially when the space is not solely dedicated for audio work, it’s important to consider monitors that can provide integrated controls to help adjust them to the specifics of the space.
All HEDD MK2 monitors come equipped with a range of DSP-enabled tools that can help with this including desktop and shelving filters, bass extension, and complete linear phase Satellite-Subwoofer setup in conjunction with the BASS subwoofers. In addition, the MK2 monitors offer the Closed or Ported functionality for two distinct sound experiences, super-accurate transient response and bass detail (closed) or more energetic bass with access to higher SPL (ported).
Making use of these integrated controls will help you mitigate any issues you can’t overcome due to the limitations of your room or others.
Conclusion
Monitor placement is an important factor to consider when setting up your music making space and a great starting point towards better understanding the necessary acoustic treatments that your space could benefit from.
By following the above recommendations you can help mitigate some of the most common issues you are likely to face. Experimenting with the placement of both your monitors and listening position, widening or narrowing the latter, can help you adjust to the specifics of your room and situation.
Our team is available to offer advice on how to place and best use your HEDD MK2 monitors, so feel free to get in touch.
Keep reading

"I love these speakers": Why Synthpop Artist Daði Freyr Trusts HEDD
For Icelandic synthpop musician Daði Freyr, the HEDD TYPE 20 MK2 unveiled a new level of clarity that has changed the way he works.

Catch HEDD at Munich High End and Berlin Superbooth 24 this May
The HEDD team will be attending the 2024 Munich High End and Berlin Superbooth trade events, showcasing the HEDDphone TWO and MK2 monitor range. Come say hi!